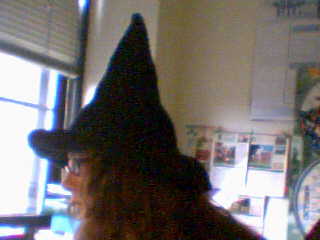
So I started a project a few days/weeks back with grand aspirations. Usually when I do this, things go terribly wrong and I give up. But not this time! I found a pattern here for an awesome witch’s hat that I wanted to try. In the process I altered the pattern a bit to suit my pesronal tastes better and I think it turned out amazingly. 

UPDATE!!! The pattern has been completed and here it is!
Witch’s hat pattern
Materials:
• Worsted weight black yarn
• USH8/5.00mm hookCone:Row 27: Ch 2, dc in same st as Ch 2, *dc in next 26 dc, 2 dc in next st, repeat from * around, join with sl st to top of Ch 2. (84dc)
Row 1: Ch 3, join with sl st to form ring. Ch 2 (counts as first dc now & throughout), 5 dc in ring, join with sl st to top of Ch 2. (6dc)
Row 2: Ch 2, dc in same st as Ch 2, *dc in next st, 2 dc in next st, repeat from * around, join with sl st to top of Ch 2. (10dc)
Row 3: Ch 2, dc in same st as Ch 2, *dc in next 2 dc, 2 dc in next st, repeat from * around, join with sl st to top of Ch 2. (12dc)
Row 4: Ch 2, dc in same st as Ch 2, *dc in next 3 dc, 2 dc in next st, repeat from * around, join with sl st to top of Ch 2. (15dc)
Row 5: Ch 2, dc in same st as Ch 2, *dc in next 4 dc, 2 dc in next st, repeat from * around, join with sl st to top of Ch 2. (18dc)
Row 6: Ch 2, dc in same st as Ch 2, *dc in next 5 dc, 2 dc in next st, repeat from * around, join with sl st to top of Ch 2. (21dc)
Row 7: Ch 2, dc in same st as Ch 2, *dc in next 6 dc, 2 dc in next st, repeat from * around, join with sl st to top of Ch 2. (24dc)
Row 8: Ch 2, dc in same st as Ch 2, *dc in next 7 dc, 2 dc in next st, repeat from * around, join with sl st to top of Ch 2. (27dc)
Row 9: Ch 2, dc in same st as Ch 2, *dc in next 8 dc, 2 dc in next st, repeat from * around, join with sl st to top of Ch 2. (30dc)
Row 10: Ch 2, dc in same st as Ch 2, *dc in next 9 dc, 2 dc in next st, repeat from * around, join with sl st to top of Ch 2. (33dc)
Row11: Ch 2, dc in same st as Ch 2, *dc in next 10 dc, 2 dc in next st, repeat from * around, join with sl st to top of Ch 2. (36dc)
Row 12: Ch 2, dc in same st as Ch 2, *dc in next 11 dc, 2 dc in next st, repeat from * around, join with sl st to top of Ch 2. (39dc)
Row 13: Ch 2, dc in same st as Ch 2, *dc in next 12 dc, 2 dc in next st, repeat from * around, join with sl st to top of Ch 2. (42dc)
Row 14: Ch 2, dc in same st as Ch 2, *dc in next 13 dc, 2 dc in next st, repeat from * around, join with sl st to top of Ch 2. (45dc)
Row 15: Ch 2, dc in same st as Ch 2, *dc in next 14 dc, 2 dc in next st, repeat from * around, join with sl st to top of Ch 2. (48dc)
Row 16: Ch 2, dc in same st as Ch 2, *dc in next 15 dc, 2 dc in next st, repeat from * around, join with sl st to top of Ch 2. (51dc)
Row 17: Ch 2, dc in same st as Ch 2, *dc in next 16 dc, 2 dc in next st, repeat from * around, join with sl st to top of Ch 2. (54dc)
Row 18: Ch 2, dc in same st as Ch 2, *dc in next 17 dc, 2 dc in next st, repeat from * around, join with sl st to top of Ch 2. (57dc)
Row 19: Ch 2, dc in same st as Ch 2, *dc in next 18 dc, 2 dc in next st, repeat from * around, join with sl st to top of Ch 2. (60dc)
Row 20: Ch 2, dc in same st as Ch 2, *dc in next 19 dc, 2 dc in next st, repeat from * around, join with sl st to top of Ch 2. (63dc)
Row 21: Ch 2, dc in same st as Ch 2, *dc in next 20 dc, 2 dc in next st, repeat from * around, join with sl st to top of Ch 2. (66dc)
Row 22: Ch 2, dc in same st as Ch 2, *dc in next 21 dc, 2 dc in next st, repeat from * around, join with sl st to top of Ch 2. (69dc)
Row 23: Ch 2, dc in same st as Ch 2, *dc in next 22 dc, 2 dc in next st, repeat from * around, join with sl st to top of Ch 2. (72dc)
Row 24: Ch 2, dc in same st as Ch 2, *dc in next 23 dc, 2 dc in next st, repeat from * around, join with sl st to top of Ch 2. (75dc)
Row 25: Ch 2, dc in same st as Ch 2, *dc in next 24 dc, 2 dc in next st, repeat from * around, join with sl st to top of Ch 2. (78dc)
Row 26: Ch 2, dc in same st as Ch 2, *dc in next 25 dc, 2 dc in next st, repeat from * around, join with sl st to top of Ch 2. (81dc)
For the brim:This is where life gets a little wonky. Bear with me and trust me in that it doesn’t need to be precise. You can add or drop a stitch in the process of a row or two and it won’t make a lick of difference.
Rnd 1: ch 2, dc in same st as ch 2, *1 dc in next st, 2 dc in next st, repeat from * around, join with sl st to top of ch 2. (126 dc)
Rnd 2: ch 2, 1 dc in next st, 1dc in each st around, ~2 dc in 1 st somewhere in the row, join with sl st to top of Ch 2. (127 dc)
Rnd 3: ch 2, 1 dc in next st, 1 dc in each st around, ~2 dc in 3 different st throughout row, join with sl st to top of Ch 2. (130 dc)
Rnd 4: ch 2, *1 dc in next 11 st, 2 dc in next st, repeat from * around, join with sl st to top of Ch 2. (140 dc)
Rnd 5: ch 2, *1 dc in next 23 st, 2 dc in next st, repeat from * around ~should total 6 increase st, will have a few extra st at the end, just 1 dc in those as well, join with sl st to top of Ch 2. (146dc)
Rnd 6: ch 2, *1 dc in next 20 st, 2 dc in next st, repeat from * around ~should total 7 increase st, will have a few extra st at the end, just 1 dc in those as well, join with sl st to top of Ch 2 (153 dc)
To finish: ch 1, *1 sc in next 10 st, 2 sc in next st, repeat from * around, sl st to beginning ch 1, fasten off, weave in all ends
Read Full Post »


